Water in OpenGL and GLES 2.0: Part 2 - Refraction
In the first part of this article I outlined the technique for creating a water effect in OpenGL / GLES which is cheap enough to run on a range of mobile devices. This part of the article looks at the first step toward implementing the effect: rendering the refraction texture.
This requires everything in the scene below the water level to be rendered to a frame buffer - an off screen render target - whose texture can then be used to feed a sampler uniform in the water material's fragment shader. The fragment shader can then project this texture on to the plane in the scene, while also blending and distorting it to create the illusion of water. I'll assume that you have read the first part of the article, and have the example scene set up in your editor of choice, and that you also have the accompanying source code from github.
Getting Started
First let's set up a render buffer to draw the refraction data to, and a sprite batch so that we can preview the buffer's contents on screen. Gameplay provides a FrameBuffer class, and a SpriteBatch class, which we'll use for the task. Add two member variables *m_refractBuffer and *m_refractBatch, and then initialise them in the initialise() function:
m_refractBuffer = gp::FrameBuffer::create("refractBuffer", bufferSize, bufferSize);
auto refractDepthTarget = gp::DepthStencilTarget::create("refractDepth", gp::DepthStencilTarget::DEPTH, bufferSize, bufferSize);
m_refractBuffer->setDepthStencilTarget(refractDepthTarget);
SAFE_RELEASE(refractDepthTarget);
m_refractBatch = gp::SpriteBatch::create(m_refractBuffer->getRenderTarget()->getTexture());
Don't forget to release the frame buffer with SAFE_RELEASE in the finalise()function, as well as delete the sprite batch with SAFE_DELETE. Notice how we can use the texture member of the frame buffer to create the sprite batch, which is useful for previewing the buffer's contents. If you've been studying the article's source code, you'll have noticed that the frame buffer's size is not in fact the same as that of the main window, nor is it even the same aspect ratio. I deliberately chose 512 x 512 as the buffer size, as many mobile devices only support power of two texture dimensions, which is important. Having experimented on a few android devices, I've found that there's a good chance the water will just appear as a black, empty hole when using textures or frame buffers with non-power of two dimensions. On the other hand you can probably use any resolution you like if you're targeting modern desktop hardware, which has the advantage that the quality of the effect will be much greater if you use a buffer resolution which matches the resolution of the render window.
Once the buffer is set up we need to draw the scene to it. In the render() function, before the call to clear() add:
//update the refract buffer
auto defaultBuffer = m_refractBuffer->bind();
auto defaultViewport = getViewport();
setViewport(gp::Rectangle(bufferSize, bufferSize));
clear(CLEAR_COLOR_DEPTH, clearColour, 1.0f, 0);
m_scene->visit(this, &WaterSample::m_drawScene, false);
Calling bind() on the buffer calls the internal OpenGL bind function, meaning that any drawing we do now will happen on the refraction frame buffer, because it is now the currently bound object. We also store the result from bind() as it returns a pointer to the previously active buffer (the main window) which we need so we can restore it immediately after updating the refraction buffer. We also store the previous viewport for the same reason.
Because this is the refraction pass of the effect, we don't actually want the water plane rendered on the refraction buffer. Adding a boolean parameter to the m_drawScene() function allows us to decide whether or not the water plane is included during the scene visit. Now we can clear() the buffer and visit() the scene, so that the scene is rendered to the refraction buffer, remembering to pass false as a parameter to visit(). When this is done, restore the previous buffer by calling its bind() function, and restore the viewport. Then we can draw the scene to the main window normally, including drawing the water plane by passing true to the scene's visit() function.
Previewing the Effect
After drawing the scene, we can use the sprite batch to draw a small preview of the refraction buffer:
if (m_showBuffers)
{
m_refractBatch->start();
m_refractBatch->draw(gp::Vector3(0.f, 4.f, 0.f), gp::Rectangle(bufferSize, bufferSize), gp::Vector2(426.f, 240.f));
m_refractBatch->finish();
}
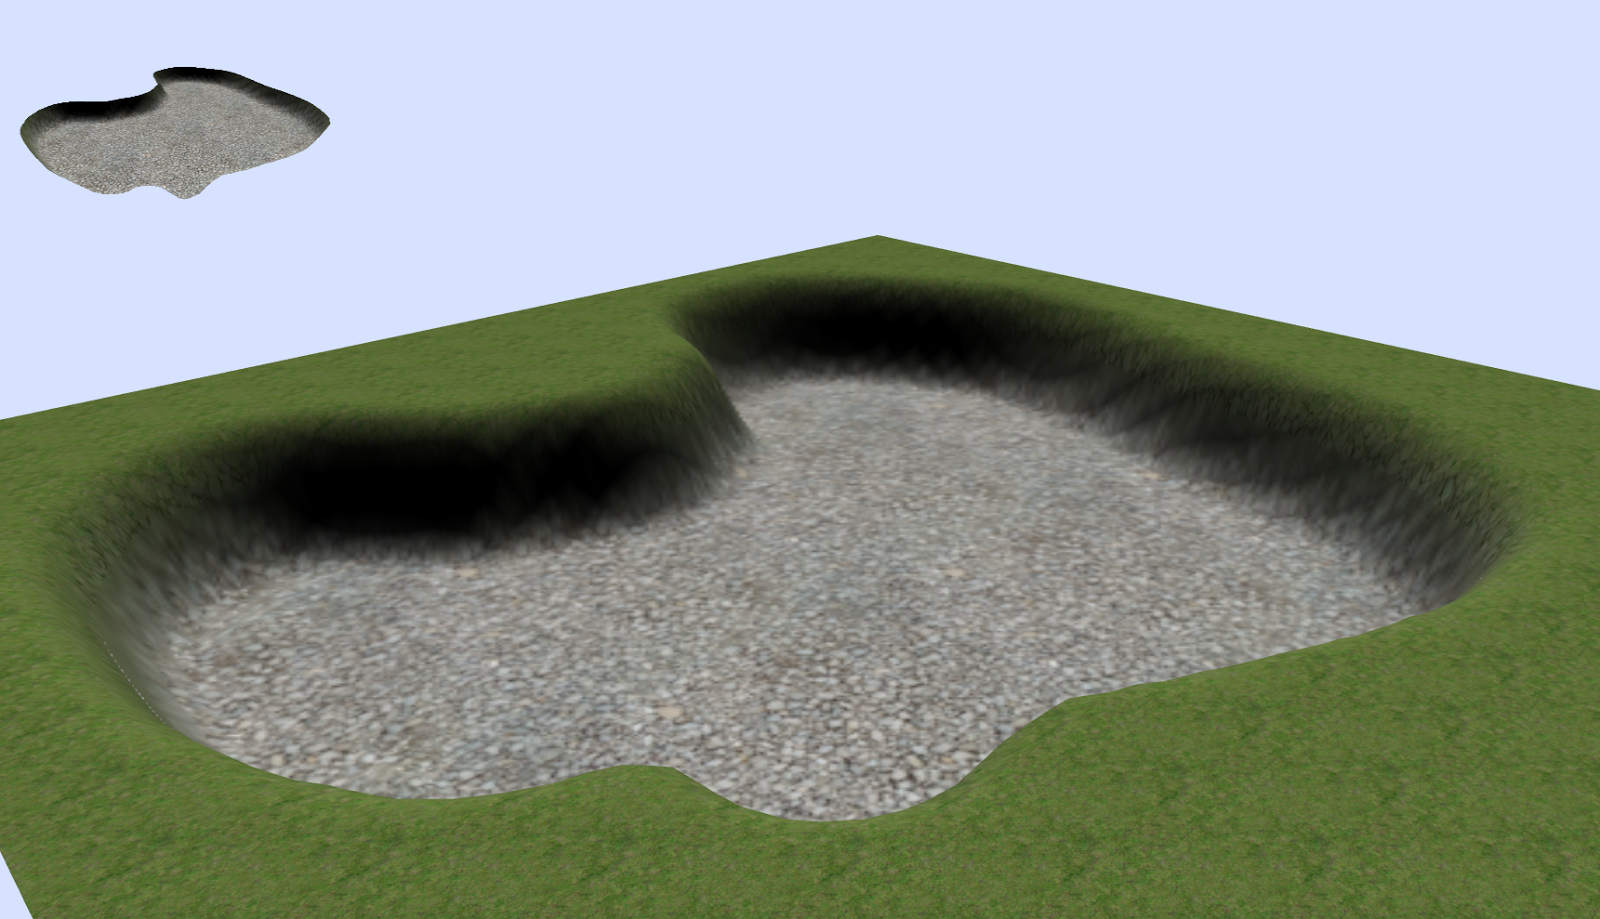
The parameters to the sprite batch draw() function allow us to define the source and destination rectangles of the refraction buffer's texture, as well as the scale. This is fortunate because it means that, even though the frame buffer has a resolution of 512 x 512, we can size and stretch the image to anything we like, as well as place it in the top left hand corner of the screen. m_showBuffers is a boolean member which can be toggled via keyboard input, providing the option to hide the preview. In the example source code I've chosen to use the space bar. Compile and run the program and you should see the now familiar scene, with a slightly smaller version drawn in the corner:

Creating a Clip Plane
Now that the rendering and preview window is set up, it's time to modify the shader used to render textured part of the scene, so that we can clip everything above the water level. GLES doesn't support glClipPlane, but we can still clip the output in the fragment shader using the equation Ax + By + Cz + D = 0 to represent the plane. To get the height of the water plane, find the Water node using the scene's findNode() function, right after loading the scene in initialise(). The height is the node's Y translation, which we can store in a member variable m_waterHeight. Next add a four component vector (Vector4) member m_clipPlane. This will be used to store the plane description according to our equation, and pass it to the fragment shader. We need to use a member variable here, as the plane needs to be set to zero when rendering the main scene so that the main scene doesn't get clipped (and, later, reversed when rendering the reflection pass). This way we can bind the vector to a uniform in the shader via a private member function which simply returns a const reference to m_clipPlane.
In the render function, before drawing the refraction pass add:
m_clipPlane.y = -1.f;
m_clipPlane.w = m_waterHeight;
This describes our water plane as facing downwards (the first three components represent a normal vector pointing from the face of the plane) with the fourth component describing the height in world units. While the vector is set to this value clipping will be performed by the shader using this plane. As we don't want to clip any of the main scene reset the plane
m_clipPlane = gp::Vector4::zero();
before drawing it.
You won't see any clipping yet, however, as we need to modify the default Textured vertex and fragment shaders provided by Gameplay. In order to make plane clipping optional I took advantage of the define system Gameplay uses, so that adding CLIP_PLANE to the defines line of the watersample.material file enables clipping on meshes which use the Textured material. In the vertex shader we need to add two new uniforms
#if defined (CLIP_PLANE)
uniform mat4 u_worldMatrix;
uniform vec4 u_clipPlane;
#endif
so we can pass the clip plane into the shader. We also need a new varying so that the calculated clip distance can be passed to the fragment shader:
#if defined(CLIP_PLANE)
varying float v_clipDistance;
#endif
and, finally, in the main function:
#if defined(CLIP_PLANE)
v_clipDistance = dot(u_worldMatrix * position, u_clipPlane);
#endif
Taking the dot product of the current vertex in world space with the clip plane returns distance from the clip plane to the current fragment. This means that after adding the corresponding varying variable to the fragment shader it only takes a quick comparison to check whether or not to discard the current fragment:
#if defined(CLIP_PLANE)
if(v_clipDistance < 0.0) discard;
#endif
The modified shader will now use the plane described in u_clipPlane to decide where the current fragment lies, and discard it if necessary. This test is done right at the beginning of the fragment shader's main function, as there's no point doing any other processing on a fragment if it is to be discarded. Finally we need to bind the value of m_clipPlane in the project's code to the shader's u_clipPlane uniform. In the initialise() function after loading the scene, find the Ground node's model's material
auto groundMaterial = m_scene->findNode("Ground")->getModel()->getMaterial();
and then bind the function we created earlier to the the u_clipPlane parameter like so:
groundMaterial->getParameter("u_clipPlane")->bindValue(this, &WaterSample::m_getClipPlane);
Phew. That's a lot to get your head around in one go. If you're a bit lost here's a brief rundown of what we did:
If you're still a little lost study the article's source code carefully. We'll be using most of this again later, when rendering the reflection buffer. If all went well compiling and running the project should present you with something similar to this:

Adding Refraction to the Scene
Now that the buffer is ready, we want to draw it on the water plane itself, which we can do by projecting it via the camera's WorldViewProjection matrix. In the article's source folder there are two shaders: watersample.frag and watersample.vert. The water material definition in watersample.material has also been updated to use these new shaders.
At the moment the watersample vertex shader is pretty simple. It takes the incoming vertex position, multiplies it by the current WorldViewProjection matrix and assigns it to gl_Position, which is standard GLSL. It also assigns the value to a varying, v_vertexRefractionPosition, so that it is passed to the fragment shader. The fragment shader has a single sampler uniform to which we bind the texture of the refraction frame buffer in initialise(), right below were we bound m_clipPlane to the textured material:
auto waterMaterial = m_scene->findNode("Water")->getModel()->getMaterial();
auto refractSampler = gp::Texture::Sampler::create(m_refractBuffer->getRenderTarget()->getTexture());
waterMaterial->getParameter("u_refractionTexture")->setSampler(refractSampler);
SAFE_RELEASE(refractSampler);
The incoming vertex coordinates are in clip space with a range of -1.0 - 1.0, and need to be converted into normalised device coordinates (0.0 - 1.0) first, which is performed by the function fromClipSpace() in the fragment shader. The coordinates can now be used to sample the texture in the normal way, via texture2D(). For now we just output the result directly to gl_FragColor, which results in this:
The texture from the refraction frame buffer is rendered onto the water plane as if it were projected from the camera (if you've done shadow mapping before then you've done projected mapping. This is the same principle, only we're projecting the image from the camera, rather than a light source). This doesn't look very impressive, possibly even a little worse as the lower resolution of the refraction buffer has blurred the output slightly, but we've made an important step towards the water effect. More importantly we've updated the Textured shader, and begun a new water shader, learning about texture projection along the way. These techniques are integral and will be built upon in the next part; rendering the reflection pass.
Part Three
References:
Eric Pacelli
Lauris Kaplinski
Riemer's XNA page
Source Code:
Github page
Previous Parts:
Part One
This requires everything in the scene below the water level to be rendered to a frame buffer - an off screen render target - whose texture can then be used to feed a sampler uniform in the water material's fragment shader. The fragment shader can then project this texture on to the plane in the scene, while also blending and distorting it to create the illusion of water. I'll assume that you have read the first part of the article, and have the example scene set up in your editor of choice, and that you also have the accompanying source code from github.
Getting Started
First let's set up a render buffer to draw the refraction data to, and a sprite batch so that we can preview the buffer's contents on screen. Gameplay provides a FrameBuffer class, and a SpriteBatch class, which we'll use for the task. Add two member variables *m_refractBuffer and *m_refractBatch, and then initialise them in the initialise() function:
m_refractBuffer = gp::FrameBuffer::create("refractBuffer", bufferSize, bufferSize);
auto refractDepthTarget = gp::DepthStencilTarget::create("refractDepth", gp::DepthStencilTarget::DEPTH, bufferSize, bufferSize);
m_refractBuffer->setDepthStencilTarget(refractDepthTarget);
SAFE_RELEASE(refractDepthTarget);
m_refractBatch = gp::SpriteBatch::create(m_refractBuffer->getRenderTarget()->getTexture());
Don't forget to release the frame buffer with SAFE_RELEASE in the finalise()function, as well as delete the sprite batch with SAFE_DELETE. Notice how we can use the texture member of the frame buffer to create the sprite batch, which is useful for previewing the buffer's contents. If you've been studying the article's source code, you'll have noticed that the frame buffer's size is not in fact the same as that of the main window, nor is it even the same aspect ratio. I deliberately chose 512 x 512 as the buffer size, as many mobile devices only support power of two texture dimensions, which is important. Having experimented on a few android devices, I've found that there's a good chance the water will just appear as a black, empty hole when using textures or frame buffers with non-power of two dimensions. On the other hand you can probably use any resolution you like if you're targeting modern desktop hardware, which has the advantage that the quality of the effect will be much greater if you use a buffer resolution which matches the resolution of the render window.
Once the buffer is set up we need to draw the scene to it. In the render() function, before the call to clear() add:
//update the refract buffer
auto defaultBuffer = m_refractBuffer->bind();
auto defaultViewport = getViewport();
setViewport(gp::Rectangle(bufferSize, bufferSize));
clear(CLEAR_COLOR_DEPTH, clearColour, 1.0f, 0);
m_scene->visit(this, &WaterSample::m_drawScene, false);
Calling bind() on the buffer calls the internal OpenGL bind function, meaning that any drawing we do now will happen on the refraction frame buffer, because it is now the currently bound object. We also store the result from bind() as it returns a pointer to the previously active buffer (the main window) which we need so we can restore it immediately after updating the refraction buffer. We also store the previous viewport for the same reason.
Because this is the refraction pass of the effect, we don't actually want the water plane rendered on the refraction buffer. Adding a boolean parameter to the m_drawScene() function allows us to decide whether or not the water plane is included during the scene visit. Now we can clear() the buffer and visit() the scene, so that the scene is rendered to the refraction buffer, remembering to pass false as a parameter to visit(). When this is done, restore the previous buffer by calling its bind() function, and restore the viewport. Then we can draw the scene to the main window normally, including drawing the water plane by passing true to the scene's visit() function.
Previewing the Effect
After drawing the scene, we can use the sprite batch to draw a small preview of the refraction buffer:
if (m_showBuffers)
{
m_refractBatch->start();
m_refractBatch->draw(gp::Vector3(0.f, 4.f, 0.f), gp::Rectangle(bufferSize, bufferSize), gp::Vector2(426.f, 240.f));
m_refractBatch->finish();
}
The parameters to the sprite batch draw() function allow us to define the source and destination rectangles of the refraction buffer's texture, as well as the scale. This is fortunate because it means that, even though the frame buffer has a resolution of 512 x 512, we can size and stretch the image to anything we like, as well as place it in the top left hand corner of the screen. m_showBuffers is a boolean member which can be toggled via keyboard input, providing the option to hide the preview. In the example source code I've chosen to use the space bar. Compile and run the program and you should see the now familiar scene, with a slightly smaller version drawn in the corner:
Creating a Clip Plane
Now that the rendering and preview window is set up, it's time to modify the shader used to render textured part of the scene, so that we can clip everything above the water level. GLES doesn't support glClipPlane, but we can still clip the output in the fragment shader using the equation Ax + By + Cz + D = 0 to represent the plane. To get the height of the water plane, find the Water node using the scene's findNode() function, right after loading the scene in initialise(). The height is the node's Y translation, which we can store in a member variable m_waterHeight. Next add a four component vector (Vector4) member m_clipPlane. This will be used to store the plane description according to our equation, and pass it to the fragment shader. We need to use a member variable here, as the plane needs to be set to zero when rendering the main scene so that the main scene doesn't get clipped (and, later, reversed when rendering the reflection pass). This way we can bind the vector to a uniform in the shader via a private member function which simply returns a const reference to m_clipPlane.
In the render function, before drawing the refraction pass add:
m_clipPlane.y = -1.f;
m_clipPlane.w = m_waterHeight;
This describes our water plane as facing downwards (the first three components represent a normal vector pointing from the face of the plane) with the fourth component describing the height in world units. While the vector is set to this value clipping will be performed by the shader using this plane. As we don't want to clip any of the main scene reset the plane
m_clipPlane = gp::Vector4::zero();
before drawing it.
You won't see any clipping yet, however, as we need to modify the default Textured vertex and fragment shaders provided by Gameplay. In order to make plane clipping optional I took advantage of the define system Gameplay uses, so that adding CLIP_PLANE to the defines line of the watersample.material file enables clipping on meshes which use the Textured material. In the vertex shader we need to add two new uniforms
#if defined (CLIP_PLANE)
uniform mat4 u_worldMatrix;
uniform vec4 u_clipPlane;
#endif
so we can pass the clip plane into the shader. We also need a new varying so that the calculated clip distance can be passed to the fragment shader:
#if defined(CLIP_PLANE)
varying float v_clipDistance;
#endif
and, finally, in the main function:
#if defined(CLIP_PLANE)
v_clipDistance = dot(u_worldMatrix * position, u_clipPlane);
#endif
Taking the dot product of the current vertex in world space with the clip plane returns distance from the clip plane to the current fragment. This means that after adding the corresponding varying variable to the fragment shader it only takes a quick comparison to check whether or not to discard the current fragment:
#if defined(CLIP_PLANE)
if(v_clipDistance < 0.0) discard;
#endif
The modified shader will now use the plane described in u_clipPlane to decide where the current fragment lies, and discard it if necessary. This test is done right at the beginning of the fragment shader's main function, as there's no point doing any other processing on a fragment if it is to be discarded. Finally we need to bind the value of m_clipPlane in the project's code to the shader's u_clipPlane uniform. In the initialise() function after loading the scene, find the Ground node's model's material
auto groundMaterial = m_scene->findNode("Ground")->getModel()->getMaterial();
and then bind the function we created earlier to the the u_clipPlane parameter like so:
groundMaterial->getParameter("u_clipPlane")->bindValue(this, &WaterSample::m_getClipPlane);
Phew. That's a lot to get your head around in one go. If you're a bit lost here's a brief rundown of what we did:
- Stored the water plane's height by retrieving it from the scene node
- Created a four component vector m_clipPlane to describe the clipping plane
- Added a private function m_getClipPlane() which returns a const reference to m_clipPlane
- Updated the clip plane's parameters during rendering
- Modified the Textured vertex and fragment shaders to discard fragments based on the plane's value
- Bound m_clipPlane's value to the shader in initialise() via the new function m_getClipPlane()
If you're still a little lost study the article's source code carefully. We'll be using most of this again later, when rendering the reflection buffer. If all went well compiling and running the project should present you with something similar to this:
Adding Refraction to the Scene
Now that the buffer is ready, we want to draw it on the water plane itself, which we can do by projecting it via the camera's WorldViewProjection matrix. In the article's source folder there are two shaders: watersample.frag and watersample.vert. The water material definition in watersample.material has also been updated to use these new shaders.
At the moment the watersample vertex shader is pretty simple. It takes the incoming vertex position, multiplies it by the current WorldViewProjection matrix and assigns it to gl_Position, which is standard GLSL. It also assigns the value to a varying, v_vertexRefractionPosition, so that it is passed to the fragment shader. The fragment shader has a single sampler uniform to which we bind the texture of the refraction frame buffer in initialise(), right below were we bound m_clipPlane to the textured material:
auto waterMaterial = m_scene->findNode("Water")->getModel()->getMaterial();
auto refractSampler = gp::Texture::Sampler::create(m_refractBuffer->getRenderTarget()->getTexture());
waterMaterial->getParameter("u_refractionTexture")->setSampler(refractSampler);
SAFE_RELEASE(refractSampler);
The incoming vertex coordinates are in clip space with a range of -1.0 - 1.0, and need to be converted into normalised device coordinates (0.0 - 1.0) first, which is performed by the function fromClipSpace() in the fragment shader. The coordinates can now be used to sample the texture in the normal way, via texture2D(). For now we just output the result directly to gl_FragColor, which results in this:
The texture from the refraction frame buffer is rendered onto the water plane as if it were projected from the camera (if you've done shadow mapping before then you've done projected mapping. This is the same principle, only we're projecting the image from the camera, rather than a light source). This doesn't look very impressive, possibly even a little worse as the lower resolution of the refraction buffer has blurred the output slightly, but we've made an important step towards the water effect. More importantly we've updated the Textured shader, and begun a new water shader, learning about texture projection along the way. These techniques are integral and will be built upon in the next part; rendering the reflection pass.
Part Three
References:
Eric Pacelli
Lauris Kaplinski
Riemer's XNA page
Source Code:
Github page
Previous Parts:
Part One

Comments
Post a Comment