Building SDL2 for Android with Visual Studio
For the last year or so Visual Studio 2015 (and now 2017) has had the ability to build Android applications using native code compiled with the Android ndk. This really appeals to me as I tend to favour the Visual Studio environment, so I thought it was finally time to see what I could do. Unfortunately the documentation for Visual Studio specific native development seems to have fallen a little by the way, or at least is very dry on the MSDN. I am, in particular, interested in game development so it made sense to me to create an SDL2 based project as SDL supports Android from the go - but setting it up in Visual Studio required a lot of trial and error. This post, then, is my attempt to best document what I did to get the project building and running on my now aging Moto G so that others - and most likely my future self - may possibly be spared the hair pulling I've endured this last week.
Project Overview
SDL2 projects on Android differ slightly to those created for desktop applications on platforms such as linux or Windows. Generally in these scenarios you link to SDL as you would any other library and start coding away. On Android, however, SDL2 does not run as a native activity application, rather it needs to be linked and invoked via a java activity so that hardware events such as input may be correctly handed down to the native code. Fortunately the SDL author provides the java source file needed within an example ndk project - it just needs a little work to include it in Visual Studio. This means that, at the very least, you need to create two Visual Studio projects - plus a third to contain your own code. If you're also writing a library to share code with other platforms the project count jumps to four, or more if you wish to include libraries such as SDL_image... I shall be concentrating on describing what it takes to build SDL2, link it to an Android java project, and have it display something with some custom code, starting with the SDL2 library. Other libraries should follow the same process more or less.
Building SDL2
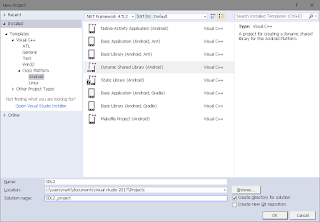
Assuming that Visual Studio 2015 or 2017 is installed along with the cross-platform development options (make sure to check this when installing VS) the first thing to do is create an empty solution, then add a new project. From the templates menu select Dynamic Shared Library. Call the project SDL2 so that Visual Studio will automatically give the library file the correct name when it gets compiled.
This will provide the basis for what's needed to build SDL2 as a shared library, although a few settings will need to be changed. It's also worth noting that the project has four configurations, ARM, ARM64, x86 and x64. Each of these will need the same modifications applied if you intend to use them, although I'll only cover the ARM configuration here. The x86 configuration is useful because these builds can be used with the x86 HAXM accelerated version of the Android emulator which runs much more quickly on a desktop computer than the ARM version.
The first thing to do is add the SDL2 source code to the project. This can be downloaded as an archive from the website, currently at version 2.0.5, although other versions should be similar if not the same. Extract the archive and copy the src and include directories to the Visual Studio project directory. In Visual Studio remove the SDL2.h, SDL2.cpp and pch.h files generated by the template. In the SDL2 folder extracted from the archive is an Android.mk file. Open this in a text editor as it contains information needed for the Visual Studio project, including a list of required source files. Using the make file as a guide add each one of the source files to the project in Visual Studio by right clicking it, selecting 'Add Existing' and selecting the corresponding files from the src directory that was copied earlier (not the source directory in the extracted archive folder).

I also add filters to represent the directory structure of the source folder, but this isn't strictly necessary.
The Android.mk file also contains a compiler flag, and a list of libraries SDL2 needs to link to. In the Visual Studio project properties add GL_GLEXT_PROTOTYPES to the C/C++ Preprocessor definitions. This is the equivalent of the LOCAL_CFLAGS parameter in the Android.mk file. Under Linker->Input in the Visual Studio project properties add the name of all the libraries listed under the LOCAL_LDLIBS property in the Android.mk file. Visual Studio also requires the maths library to be linked for some reason, presumably ndk-build automatically adds this when using the Android.mk file. This is added by typing m; at the front of the list of libraries (order is important).

Finally add the local SDL2 include directory to Additional Include Directories under C/C++->General, and then under Precompiled Headers select Not using Precompiled Headers.

And that's it for the SDL library. Right click on the project in the explorer tree and select Build (or press F7) and Visual Studio should compile the source and output a file called libSDL2.so.
Creating the activity
To run SDL2 on Android a second project needs to be created which provides a java activity that invokes the native code. The code for this is provided in the SDL2 source archive but, again, requires some setup to work with Visual Studio. Add a new project to the solution, this time selecting the template for Basic Application.

In the solution explorer right click on the project references, and select SDL2. This tells Visual Studio that it should build and package the SDL2 library in this application. In the folder which was extracted from the SDL2 source archive is a directory named android-project. Inside this is a folder called src, the contents of which need to be copied to the src folder found inside the new directory containing the Visual Studio application project. This folder contains the java source file required to invoke SDL2 in the application. Back in Visual Studio click 'Show All Files' in the Solution Explorer so that the org folder (copied from the archive src to the project src) appears in the tree. Right click it and select 'include in project'.

A java file under org.libsdl.app called SDLActivity.java should now be included in the project. Import this to the application java file which was created with the project, then remove the 'hello world' example code. Modify the class so that it now extends SDLActivity.

Make sure to call super.onCreate().It's this function which will invoke the SDL native code. Building the project should now automatically build and package the SDL2 library and output an apk file. On its own, however, this apk is not much use. The final step is to add and invoke your own code.
Adding your own code
To make the application actually do something a third project is required which contains the code for your game or application. Setting this project up is pretty generic, and once it's done you can continue to write your software in pretty much the same way as you would for any other platform. Add another project to the Visual Studio solution, again selecting Dynamic Shared Library. This can be named anything you like, but as it will contain the entry point to the native code SDL2 expects it to be named 'main' by default.
In the project properties add the SDL2 include directory to the include path (as well as any of your own include directories). Disable using precompiled headers.

To link SDL2 to the project go to Linker->General and add a new path to Addition Library Directories: $(SolutionDir)$(Platform)\$(Configuration)
This should automatically evaluate to the output directory of the SDL2 project for each of the platform configurations.

Under input add the same libraries as the SDL2 project, followed by SDL2 itself.

The project template creates three source files containing some boiler plate code. Remove pch.h, and main.h but keep replace the contents of main.cpp with the standard main() entrypoint code. All of your application's code will be initiated from here, and this file can be shared between multiple SDL2 projects, for instance when building for both desktop and android platforms.

Right click on the project and select 'Add Existing' and browse to the SDL2 src folder belonging to the SDL2 project. Here there is a folder named main. Inside this is a folder named android which contains a file named SDL_android_main.c. Add this to the project. SDL uses this to implement its own entrypoint and is needed here because it is called automatically from the java application during onCreate().
To make sure the code is referenced properly from the java application, right click on the java application project's references node in the solution explorer and select 'Add Reference'. Check the box next to main - SDL2 should already be checked, if not check it too. If your project is named anything other than main - or you're adding another library such as SDL_image - browse to src/org/libsdl/app in the solution explorer and open SDLActivity.java. Around line 72 is an array of library names which will be loaded when the application is run. By default it already contains SDL2 and main, but this will need to be modified to add any extra libraries, or if main is named something else. Note that these are the names of the .so files without the preceeding lib and .so extension.

Conclusion
This is the bare essential setup for creating an Android compatible application based on SDL2. Adding further libraries can be achieved the same way as setting up SDL2 itself; by creating a new project, configuring it and adding the sourcecode. Remember to reference these libraries in the java application project, and modify the array of library names to include the new library.
If you wish to use C++ in any project code make sure to set the language version to C++11 or C++1y under the language setting of the project properties, should you need any particular language features.
For reference I've uploaded the configured solution with an example main project to github, which can be found here. It was made with Visual Studio 2017.
Project Overview
SDL2 projects on Android differ slightly to those created for desktop applications on platforms such as linux or Windows. Generally in these scenarios you link to SDL as you would any other library and start coding away. On Android, however, SDL2 does not run as a native activity application, rather it needs to be linked and invoked via a java activity so that hardware events such as input may be correctly handed down to the native code. Fortunately the SDL author provides the java source file needed within an example ndk project - it just needs a little work to include it in Visual Studio. This means that, at the very least, you need to create two Visual Studio projects - plus a third to contain your own code. If you're also writing a library to share code with other platforms the project count jumps to four, or more if you wish to include libraries such as SDL_image... I shall be concentrating on describing what it takes to build SDL2, link it to an Android java project, and have it display something with some custom code, starting with the SDL2 library. Other libraries should follow the same process more or less.
Building SDL2
Assuming that Visual Studio 2015 or 2017 is installed along with the cross-platform development options (make sure to check this when installing VS) the first thing to do is create an empty solution, then add a new project. From the templates menu select Dynamic Shared Library. Call the project SDL2 so that Visual Studio will automatically give the library file the correct name when it gets compiled.

This will provide the basis for what's needed to build SDL2 as a shared library, although a few settings will need to be changed. It's also worth noting that the project has four configurations, ARM, ARM64, x86 and x64. Each of these will need the same modifications applied if you intend to use them, although I'll only cover the ARM configuration here. The x86 configuration is useful because these builds can be used with the x86 HAXM accelerated version of the Android emulator which runs much more quickly on a desktop computer than the ARM version.
The first thing to do is add the SDL2 source code to the project. This can be downloaded as an archive from the website, currently at version 2.0.5, although other versions should be similar if not the same. Extract the archive and copy the src and include directories to the Visual Studio project directory. In Visual Studio remove the SDL2.h, SDL2.cpp and pch.h files generated by the template. In the SDL2 folder extracted from the archive is an Android.mk file. Open this in a text editor as it contains information needed for the Visual Studio project, including a list of required source files. Using the make file as a guide add each one of the source files to the project in Visual Studio by right clicking it, selecting 'Add Existing' and selecting the corresponding files from the src directory that was copied earlier (not the source directory in the extracted archive folder).

I also add filters to represent the directory structure of the source folder, but this isn't strictly necessary.
The Android.mk file also contains a compiler flag, and a list of libraries SDL2 needs to link to. In the Visual Studio project properties add GL_GLEXT_PROTOTYPES to the C/C++ Preprocessor definitions. This is the equivalent of the LOCAL_CFLAGS parameter in the Android.mk file. Under Linker->Input in the Visual Studio project properties add the name of all the libraries listed under the LOCAL_LDLIBS property in the Android.mk file. Visual Studio also requires the maths library to be linked for some reason, presumably ndk-build automatically adds this when using the Android.mk file. This is added by typing m; at the front of the list of libraries (order is important).

Finally add the local SDL2 include directory to Additional Include Directories under C/C++->General, and then under Precompiled Headers select Not using Precompiled Headers.

And that's it for the SDL library. Right click on the project in the explorer tree and select Build (or press F7) and Visual Studio should compile the source and output a file called libSDL2.so.
Creating the activity
To run SDL2 on Android a second project needs to be created which provides a java activity that invokes the native code. The code for this is provided in the SDL2 source archive but, again, requires some setup to work with Visual Studio. Add a new project to the solution, this time selecting the template for Basic Application.

In the solution explorer right click on the project references, and select SDL2. This tells Visual Studio that it should build and package the SDL2 library in this application. In the folder which was extracted from the SDL2 source archive is a directory named android-project. Inside this is a folder called src, the contents of which need to be copied to the src folder found inside the new directory containing the Visual Studio application project. This folder contains the java source file required to invoke SDL2 in the application. Back in Visual Studio click 'Show All Files' in the Solution Explorer so that the org folder (copied from the archive src to the project src) appears in the tree. Right click it and select 'include in project'.

A java file under org.libsdl.app called SDLActivity.java should now be included in the project. Import this to the application java file which was created with the project, then remove the 'hello world' example code. Modify the class so that it now extends SDLActivity.

Make sure to call super.onCreate().It's this function which will invoke the SDL native code. Building the project should now automatically build and package the SDL2 library and output an apk file. On its own, however, this apk is not much use. The final step is to add and invoke your own code.
Adding your own code
To make the application actually do something a third project is required which contains the code for your game or application. Setting this project up is pretty generic, and once it's done you can continue to write your software in pretty much the same way as you would for any other platform. Add another project to the Visual Studio solution, again selecting Dynamic Shared Library. This can be named anything you like, but as it will contain the entry point to the native code SDL2 expects it to be named 'main' by default.
In the project properties add the SDL2 include directory to the include path (as well as any of your own include directories). Disable using precompiled headers.

To link SDL2 to the project go to Linker->General and add a new path to Addition Library Directories: $(SolutionDir)$(Platform)\$(Configuration)
This should automatically evaluate to the output directory of the SDL2 project for each of the platform configurations.

Under input add the same libraries as the SDL2 project, followed by SDL2 itself.

The project template creates three source files containing some boiler plate code. Remove pch.h, and main.h but keep replace the contents of main.cpp with the standard main() entrypoint code. All of your application's code will be initiated from here, and this file can be shared between multiple SDL2 projects, for instance when building for both desktop and android platforms.

Right click on the project and select 'Add Existing' and browse to the SDL2 src folder belonging to the SDL2 project. Here there is a folder named main. Inside this is a folder named android which contains a file named SDL_android_main.c. Add this to the project. SDL uses this to implement its own entrypoint and is needed here because it is called automatically from the java application during onCreate().
To make sure the code is referenced properly from the java application, right click on the java application project's references node in the solution explorer and select 'Add Reference'. Check the box next to main - SDL2 should already be checked, if not check it too. If your project is named anything other than main - or you're adding another library such as SDL_image - browse to src/org/libsdl/app in the solution explorer and open SDLActivity.java. Around line 72 is an array of library names which will be loaded when the application is run. By default it already contains SDL2 and main, but this will need to be modified to add any extra libraries, or if main is named something else. Note that these are the names of the .so files without the preceeding lib and .so extension.

Conclusion
This is the bare essential setup for creating an Android compatible application based on SDL2. Adding further libraries can be achieved the same way as setting up SDL2 itself; by creating a new project, configuring it and adding the sourcecode. Remember to reference these libraries in the java application project, and modify the array of library names to include the new library.
If you wish to use C++ in any project code make sure to set the language version to C++11 or C++1y under the language setting of the project properties, should you need any particular language features.
For reference I've uploaded the configured solution with an example main project to github, which can be found here. It was made with Visual Studio 2017.

Thanks for your updated GitHub example for 2.0.9. I suspect you are aware that when built it shows a message showing that it can't find libhidapi? I have removed the use of that library from SDLActivity.java line 253 and the example runs. However it runs twice. From what I've read this may be the result of there being an AndroidManifest.xml also in the SD2 library build. Removing it from the ARM build made it run only once though not from the x86 build (possibly a manifest was still sticking around due to incremental builds).
ReplyDeleteHi, sorry I've only just seen your comment - I wasn't notified for some reason. I wasn't aware of this problem, thanks for pointing it out. I will fix it ASAP
DeleteThe problem was caused by the window being set to 640x480 (landscape) and I was testing on a phone (portrait). So it ran twice when it needed to go from portrait to landscape. It's sort of an SDL flaw that has been discussed on the forum.
ReplyDeleteYou can take updated version for MSVS 2019 here https://github.com/gapkalov/sdl2vs
ReplyDeleteThank you for your efforts! I have merged the changes into the example repository
DeletePlease if it possible add SDL_mixer to the configured solution on github too, Thank you
ReplyDeleteNeed help Error compiling it in msv2019 pro
ReplyDeletegradlew.bat invalid path?
Error MSB3073 The command "gradlew.bat -p SDL2_GradleApp\app" assembleARM7Debug" exited with code 1. SDL2_GradleApp E:\MVS2019\MSBuild\Microsoft\MDD\Android\V150\Android.Common.targets 530
Failed to apply plugin [class 'com.android.build.gradle.model.BaseComponentModelPlugin'
DeleteThis comment has been removed by the author.
DeleteThis is a very nice tutorial,thank you for all the efforts put into it . It works perfectly, but I wanted to run my application in release mode , but the APK doesn't install on my Android.The Debug mode version of the app works fine but when I switch to release mode , the APK fails to install .
ReplyDeleteI want to run in release mode because debug mode has almost of extra stuff in the code that are cleaned up and optimistimzed in release mode, at least that how it is in .exe files .
Any help would be highly appreciated.Thank you
Need help same Error compiling it in msv2019
ReplyDeletegradlew.bat invalid path?
Error MSB3073 The command "gradlew.bat -p SDL2_GradleApp\app" assembleARM7Debug" exited with code 1. SDL2_GradleApp E:\MVS2019\MSBuild\Microsoft\MDD\Android\V150\Android.Common.targets 530